
Background
These activities are designed to demonstrate conduction heat transfer using common materials as examples. Caution: the heat lamps used in this activity will become very hot and can cause injury or burn flammable material. Students should use safety glasses and keep a safe distance from the lamp.
Materials
- Lab stands (4 total)
- Clamps and clamp holders (as needed to hold plate, thermometers and lamp)
- Heat lamp with clamp on fixture (1 total)
- Thermometers or electronic temperature sensors with displays (2 total)
- Metal plates (approximately 12" by 12", painted gray or black) (1 minimum)
Part 1- Metal Plate Only
[Note that the setup and experiment for Part 1 is the same as Part 1 of the Radiation Activity where only the plate is used, so data from the Radiation Activity Part 1 can be used here as the control].
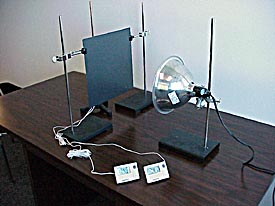
Set up test stands
as shown in Figure 1, starting with the plain metal plate and heat lamp
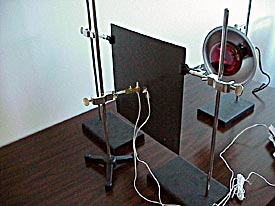
approximately 12" from the plate. Place one temperature sensor or
thermometer so there is a ½" to ¾" airspace behind
the plate, and tape another to the center of the back of the plate, as
shown in Figure 2.
 |
 |
Figure
1: Example of conduction activity setup. |
Figure
2: Temperature sensor placement. |
Allow at least 10 minutes after setting the experiment up before turning on the heat lamp and taking any measurements to allow the plate and sensors to reach with ½oF of ambient temperature (turning on a fan to blow air across the plate will greatly speed up this process). Now turn the lamp on and have students take plate and air temperature measurements every minute for 5 minutes (5 readings).
Part 2 - Bubble Wrap Plate
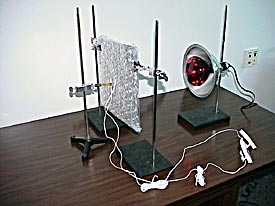
| Then being careful because the plate may be hot, switch out the plate with an identical plate with two layers of bubble wrap on one side, setting up the plate so that the bubble wrap is facing away from the lamp as shown in Figure 3. You can alternatively allow the original plate to cool and attach the bubble wrap to that plate. After again waiting until the plate is close to ambient temperature, turn the heat lamp on and have students take plate and air temperature measurements every minute for 5 minutes. |  |
Figure
2: Temperature sensor placement. |
Data
Analysis and Discussion
Plot the data and discuss. Did any of the results surprise you? Why did the sensor ~¾" behind the plate not heat up as fast when the bubble wrap was attached to the plate as it did when there was no insulation on the plate (what heat transfer mechanism was involved)?
Part 3 - Other Insulators
The above experiment in Part 2 can be repeated with a number of insulating materials (e.g. rigid foam insulation, cork board, corrugated cardboard) attached to the metal plate to provide a comparison or even contest to see who can come up with the best insulator (you’ll want to use materials with about the same total thicknesses).
National Science Standards | Glossary | References | Site Map | Feedback Form
Individual pages from this web site may be printed
and duplicated for
student classroom use
provided that proper credit is given to
the Florida Solar
Energy Center (FSEC).
